Web interface
CAPE provides a full-fledged web interface in the form of a Django application. This interface will allow you to submit files, browse through the reports as well as search across all the analysis results.
cape2.sh adds systemd daemon called cape-web.service which listen on all interfaces:
$ /lib/systemd/system/cape-web.service
To modify that you need to edit that file and change from 0.0.0.0 to your IP.
You need to restart daemon to reload after change it:
$ systemctl daemon-reload
If you get migration-related WARNINGS when launching the cape-web service, you should execute:
$ poetry run python3 manage.py migrate
Note
In order to improve performance, it is recommended to move from SQLite to PostgreSQL.
Configuration
The web interface pulls data from a Mongo database or ElasticSearch, so having
either the MongoDB or ElasticSearchDB reporting modules enabled in reporting.conf
is mandatory for this interface. If that’s not the case, the application won’t start
and it will raise an exception. Also, currently, Django only supports having one of
the database modules enabled at a time.
Enable web interface auth
To enable web authentication you need to edit conf/web.conf -> web_auth -> enabled = yes, after that you need to create your django admin user by running following command from web folder:
$ poetry run python manage.py createsuperuser
For more security tips see Exposed to internet section.
Enable/Disable REST API Endpoints
By default, there are multiple REST API endpoints that are disabled. To enable them, head to the API configuration file
For example, to enable the machines/list endpoint, you must find the [machinelist] header in the configuration file just mentioned and set the enabled field to yes.
Restart the CAPE web service for the changes to take effect:
$ systemctl restart cape-web
Usage
To start the web interface, you can simply run the following command
from the web/ directory:
$ poetry run python3 manage.py runserver_plus --traceback --keep-meta-shutdown
If you want to configure the web interface as listening for any IP on a specified port (by default the web interface is deployed at localhost:8000), you can start it with the following command (replace PORT with the desired port number):
$ poetry run python3 manage.py runserver_plus 0.0.0.0:8000 --traceback --keep-meta-shutdown
You can serve CAPE’s web interface using WSGI interface with common web servers: Apache, Nginx, Unicorn, and so on. Devs are using Nginx + Uwsgi. Please refer both to the documentation of the web server of your choice as well as Django documentation.
Subscription
Subscription allows you to control which users what can do what.
Right now we support:
Request - Limits per second/minute/hour using django-ratelimit extensions
Reports - Allow or block downloading reports for specific users. Check conf/web.conf to enable this feature.
To extend the capabilities of control what users can do check Django migrations a primer.
In few words you need to add new fields to models.py and run poetry run python3 manage.py makemigrations
Exposed to internet
To get rid of many bots/scrappers so we suggest deploying this amazing project Nginx Ultimate bad bot blocker, follow the README for installation steps
Enable web auth with captcha in conf/web.conf properly to avoid any brute force.
Enable ReCaptcha. You will need to set
RECAPTCHA_PUBLIC_KEYandRECAPTCHA_PRIVATE_KEYkeys inweb/web/local_settings.pyYou might need to “Verify” and set as “Stuff user” to your admin in the Django admin panel and add your domain to Sites in Django admin too
- AllAuth aka SSO authentication with Google, Github, etc. Video Tutorial & StackOverflow Example:
Note
SITE_ID=1in django admin isexample.comrename it to your domain to get it working
Best practices for production
Gunicorn + NGINX is the recommended way of serving the CAPE web UI.
Gunicorn
First, configure the cape-web service to use Gunicorn
Modify /lib/systemd/system/cape-web.service so the ExecStart
setting is set to:
ExecStart=/usr/bin/python3 -m poetry run gunicorn web.wsgi -w 4 -t 200 --capture-output --enable-stdio-inheritance
Run
sudo systemctl daemon-reload
sudo service cape-web restart
NGINX
Next, install NGINX and configure it to be a reverse proxy to Gunicorn.
sudo apt install nginx
Create a configuration file at /etc/nginx/conf.d/cape.
You might need to add include /etc/nginx/conf.d/*.conf; to http section inside of /etc/nginx/nginx.conf.
Replace www.capesandbox.com with your actual hostname.
server {
    listen 80;
    server_name www.capesandbox.com;
    client_max_body_size 101M;
    proxy_connect_timeout 75;
    proxy_send_timeout 200;
    proxy_read_timeout 200;


    location ^~ /.well-known/acme-challenge/ {
        default_type "text/plain";
        root         /var/www/html;
        break;
    }

    location = /.well-known/acme-challenge/ {
        return 404;
    }

    location / {
        proxy_pass http://127.0.0.1:8000;
        proxy_set_header Host $host;
        proxy_set_header X-Remote-User $remote_user;
        proxy_set_header X-Real-IP $remote_addr;
        proxy_set_header X-Forwarded-For $proxy_add_x_forwarded_for;
    }

    location /static/ {
        alias /opt/CAPEv2/web/static/;
    }

    location /static/admin/ {
        proxy_pass http://127.0.0.1:8000;
        proxy_set_header Host $host;
        proxy_set_header X-Remote-User $remote_user;
        proxy_set_header X-Real-IP $remote_addr;
        proxy_set_header X-Forwarded-For $proxy_add_x_forwarded_for;
    }

    location /guac {
        proxy_pass http://127.0.0.1:8008;
        proxy_set_header X-Forwarded-Proto $scheme;
        proxy_set_header Host $host;
        proxy_set_header X-Real-IP $remote_addr;
        proxy_buffering off;
        proxy_http_version 1.1;
        proxy_set_header X-Forwarded-For $proxy_add_x_forwarded_for;
        proxy_set_header Upgrade $http_upgrade;
        proxy_set_header Connection $http_connection;
    }

    location /recordings/playback/recfile {
        alias /opt/CAPEv2/storage/guacrecordings/;
        autoindex off;
    }
}
Now enable the nginx configuration by executing the following:
rm -f /etc/nginx/conf.d/default
ln -s /etc/nginx/conf.d/cape /etc/nginx/conf.d/default
If you want to block users from changing their own email addresses, add the following location directive inside of the server directive:
location /accounts/email/ {
    return 403;
}
If you want to block users from changing their own passwords, add the following location directive inside of the server directive:
location /accounts/email/ {
    return 403;
}
The recording files written by guacd are only readable by the cape user and other members of the cape group, so in order for NGINX to read and serve the recordings the www-data user must be added to the cape group.
sudo usermod www-data -G cape
Then restart NGINX
sudo service nginx restart
Warning
The CAPE Guacamole Django web application is currently separate from the main CAPE Django web application, and does not support any authentication. Anyone who can connect to the web server access can Guacamole consoles and recordings, if they know the CAPE analysis ID and Guacamole session GUID.
NGINX can be configured to require HTTP basic authentication for all CAPE web applications, as an alternative to the Django authentication system.
Install the apache2-utils package, which contains the htpasswd utility.
sudo apt install apache2-utils
Use the htpasswd file to create a new password file and add a first user, such as cape.
sudo htpasswd -c /opt/CAPEv2/web/.htpasswd cape
Use the same command without the -c option to add another user to an existing password file.
Set the proper file permissions.
sudo chown root:www-data /opt/CAPEv2/web/.htpasswd
sudo chmod u=rw,g=r,o= /opt/CAPEv2/web/.htpasswd
Add the following lines to the NGINX configuration, just below the client_max_body_size line.
auth_basic           "Authentication required";
auth_basic_user_file /opt/CAPEv2/web/.htpasswd;
Then restart NGINX
sudo service nginx restart
Let’s Encrypt certificates
If you would like to install a free Let’s Encrypt certificate on your NGINX
server, follow these steps, replacing capesandbox.com with your actual
hostname. Use cape2.sh to install dependencies. But also ensure that instruction
are up to date with this https://certbot.eff.org/
Install certbot.
sudo cape2.sh letsencrypt
Request the certificate
sudo certbot certonly --webroot -w /var/www/html -d www.capesandbox.com -d capesandbox.com
Install the certificate. When prompted, select the “Attempt to reinstall this existing certificate” option.
sudo certbot --nginx -d www.capesandbox.com -d capesandbox.com
Some extra security TIP(s)
ModSecurity tutorial - rejects requests
Fail2ban tutorial - ban hosts
Fail2ban + CloudFlare - how to ban on CloudFlare aka CDN firewall level
Example of cloudflare action ban:
# Author: Mike Andreasen from https://guides.wp-bullet.com
# Adapted Source: https://github.com/fail2ban/fail2ban/blob/master/config/action.d/cloudflare.conf
# Referenced from: https://www.normyee.net/blog/2012/02/02/adding-cloudflare-support-to-fail2ban by NORM YEE
#
# To get your Cloudflare API key: https://www.cloudflare.com/my-account, you should use GLOBAL KEY!

[Definition]

# Option:  actionstart
# Notes.:  command executed once at the start of Fail2Ban.
# Values:  CMD
#
actionstart =

# Option:  actionstop
# Notes.:  command executed once at the end of Fail2Ban
# Values:  CMD
#
actionstop =

# Option:  actioncheck
# Notes.:  command executed once before each actionban command
# Values:  CMD
#
actioncheck =

# Option:  actionban
# Notes.:  command executed when banning an IP. Take care that the
#          command is executed with Fail2Ban user rights.
# Tags:      IP address
#            number of failures
#            unix timestamp of the ban time
# Values:  CMD

actionban = curl -s -X POST "https://api.cloudflare.com/client/v4/user/firewall/access_rules/rules" -H "X-Auth-Email: <cfuser>" -H "X-Auth-Key: <cftoken>" -H "Content-Type: application/json" --data '{"mode":"block","configuration":{"target":"ip","value":"<ip>"},"notes":"Fail2ban"}'

# Option:  actionunban
# Notes.:  command executed when unbanning an IP. Take care that the
#          command is executed with Fail2Ban user rights.
# Tags:      IP address
#            number of failures
#            unix timestamp of the ban time
# Values:  CMD
#

actionunban = curl -s -X DELETE "https://api.cloudflare.com/client/v4/user/firewall/access_rules/rules/$( \
            curl -s -X GET "https://api.cloudflare.com/client/v4/user/firewall/access_rules/rules?mode=block&configuration_target=ip&configuration_value=<ip>&page=1&per_page=1&match=all" \
            -H "X-Auth-Email: <cfuser>" \
            -H "X-Auth-Key: <cftoken>" \
            -H "Content-Type: application/json" | awk -F"[,:}]" '{for(i=1;i<=NF;i++){if($i~/'id'\042/){print $(i+1)}}}' | tr -d '"' | head -n 1)" \
            -H "X-Auth-Email: <cfuser>" \
            -H "X-Auth-Key: <cftoken>" \
            -H "Content-Type: application/json"

[Init]

# Option: cfuser
# Notes.: Replaces <cfuser> in actionban and actionunban with cfuser value below
# Values: Your CloudFlare user account

cfuser = put-your-cloudflare-email-here

# Option: cftoken
# Notes.: Replaces <cftoken> in actionban and actionunban with cftoken value below
# Values: Your CloudFlare API key
cftoken = put-your-API-key-here
Example of fail2ban rule to ban by path:
# This will ban any host that trying to access /api/ for 3 times in 1 minute
# Goes to /etc/fail2ban/filters.d/nginx-cape-api.conf
[Definition]
failregex = ^<HOST> -.*"(GET|POST|HEAD) /api/.*HTTP.*"
ignoreregex =

# goes to /etc/fail2ban/jail.local
[cape-api]
enabled = true
port    = http,https
filter  = nginx-cape-api
logpath = /var/log/nginx/access.log
maxretry = 3
findtime = 60
bantime = -1
# Remove cloudflare line if you don't use it
action = iptables-multiport
         cloudflare

# This will ban any host that trying to brute force login or unauthorized requests for 5 times in 1 minute
# Goes to /etc/fail2ban/filters.d/filter.d/nginx-cape-login.conf
[Definition]
failregex = ^<HOST> -.*"(GET|POST|HEAD) /accounts/login/\?next=.*HTTP.*"
ignoreregex =

# goes to /etc/fail2ban/jail.local
[cape-login]
enabled = true
port    = http,https
filter  = nginx-cape-login
logpath = /var/log/nginx/access.log
maxretry = 5
findtime = 60
bantime = -1
# Remove cloudflare line if you don't use it
action = iptables-multiport
          cloudflare
To check banned hosts:
$ sudo fail2ban-client status cape-api
Troubleshooting
Login error: no such column: users_userprofile.reports
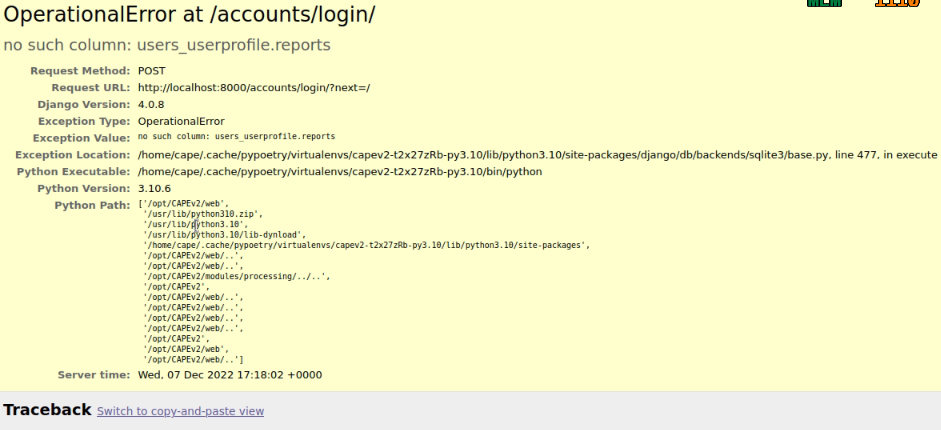
This error usually appears after updating CAPEv2 and one or more changes have been made to the database schema. To solve it, you must use the web/manage utility like so:
$ sudo -u cape poetry run python3 manage.py migrate
The output should be similar to:
$ sudo -u cape poetry run python3 manage.py migrate
CAPE parser: No module named Nighthawk - No module named 'Crypto'
Missed dependency flare-floss: poetry run pip install -U flare-floss
Operations to perform:
  Apply all migrations: account, admin, auth, authtoken, contenttypes, openid, sessions, sites, socialaccount, users
Running migrations:
  Applying users.0002_reports... OK
After the OK, the web service should be back to normal (no need to restart cape-web.service).
No such table: auth_user
When executing:
$ poetry run python manage.py createsuperuser
an error like django.db.utils.OperationalError: no such table: auth_user
may be raised. In order to solve it just execute the web/manage.py utility with the migrate option:
$ sudo -u cape poetry run python3 web/manage.py migrate
Slow web/API searches when using MongoDB as backend
Check server lack of resources as memory ram, cpu or even slow hard drive.
Possible issue is the lack of proper indexes.
List your MongoDB indexes:
db.analysis.getIndexes()
Test your query with explaination. Replace with your search patterns:
db.analysis.find({"target.file.name": "<name>"}).explain("executionStats")
Pay attention to stage value:
executionStages: {
    stage: 'COLLSCAN', # <--- Full collection scan instead of index usage
If you expect it to search in index, expected output should be like this:
executionStages: {
    stage: 'FETCH',
    <stripped>
    inputStage: {
        stage: 'IXSCAN', # <--- Index usage
How to delete index
db.collection.dropIndexes("<index name>")