Saving the Virtual Machine
Now you should be ready to save the virtual machine to a snapshot state.
Before doing this, make sure that you have rebooted the guest softly and that it’s currently running, with CAPE’s agent running and with Windows fully booted.
Now you can proceed with saving the machine, which depends on the virtualization software that you decided to use.
The virtualization software-specific instructions found below can assist with getting the virtual machine ready to be used by CAPE.
KVM
Here are some helpful links for creating a virtual machine with virt-manager:
If you have decided to adopt KVM, you must use a disk format for
your virtual machines that supports snapshots.
By default, libvirt tools create RAW virtual disks, and since we need snapshots
you’ll have to use either QCOW2 or LVM. For the scope of this guide, we adopt QCOW2,
since it is easier to set up than LVM.
The easiest way to create such a virtual disk is by using the tools
provided by the libvirt suite. You can either use virsh if you prefer
command-line interfaces or virt-manager for a nice GUI.
You should be able to directly create the virtual disk in the QCOW2 format, but in case you have
a RAW disk you can convert it like this:
$ cd /your/disk/image/path
$ qemu-img convert -O qcow2 your_disk.raw your_disk.qcow2
Now edit your VM definition as follows:
$ virsh edit "<Name of VM>"
Find the disk section, which looks like this:
<disk type='file' device='disk'>
    <driver name='qemu' type='raw'/>
    <source file='/your/disk/image/path/your_disk.raw'/>
    <target dev='hda' bus='ide'/>
    <address type='drive' controller='0' bus='0' unit='0'/>
</disk>
And change “type” to qcow2 and “source file” to your qcow2 disk image path, like this:
<disk type='file' device='disk'>
    <driver name='qemu' type='qcow2'/>
    <source file='/your/disk/image/path/your_disk.qcow2'/>
    <target dev='hda' bus='ide'/>
    <address type='drive' controller='0' bus='0' unit='0'/>
</disk>
KVM by default will pass through a feature flag, viewable in ECX as the 31st bit after executing the CPUID instruction with EAX set to 1. Some malware will use this unprivileged instruction to detect its execution in a VM. One way to avoid this is to modify your VM definition as follows: find the following line:
<domain type='kvm'>
Change it to:
<domain type='kvm' xmlns:qemu='http://libvirt.org/schemas/domain/qemu/1.0'>
Then within the domain element, add the following:
<qemu:commandline>
  <qemu:arg value='-cpu'/>
  <qemu:arg value='host,-hypervisor'/>
</qemu:commandline>
Instead of using “host”, you can also choose from multiple other CPU models from the
list displayed with the qemu-system-i386 -cpu help command (SandyBridge, Haswell, etc).
Now test your virtual machine. If everything works, prepare it for snapshotting while
running CAPE’s agent. This means the virtual machine needs to be running
when you take the snapshot.
You can take a snapshot with the following command via virsh:
$ virsh snapshot-create "<Name of VM>"
$ virsh snapshot-create-as --domain "<Name of VM>" --name "<Name of snapshot>"
After snapshotting the guest, you can shut it down.
Warning
Having multiple snapshots can cause errors such as:
ERROR: No snapshot found for virtual machine <VM-Name>VM snapshots can be managed using the following commands.
$ virsh snapshot-list “<VM-Name>”
$ virsh snapshot-delete “<VM-Name>” “<Snapshot-Name>””
Snapshot with Virtual Manager (virt-manager)
If you are using virtual manager (virt-manager) to manage you VMs (as mentioned in the To install KVM chapter), you can also use it to create the snapshots.
Warning
Virtual manager allows you to create either internal or external snapshots (which you can read more about here). The arguably easier mode of operation are internal snapshots, given that external ones use individual files that may mess up your whole libvirt - qemu - kvm installation in case of name/path modification or loss.
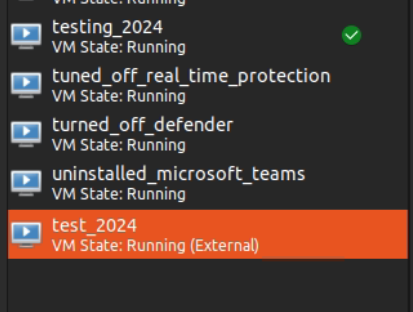
When creating a new snapshot, in newer versions of KVM you can select whether you want an internal or external or one:
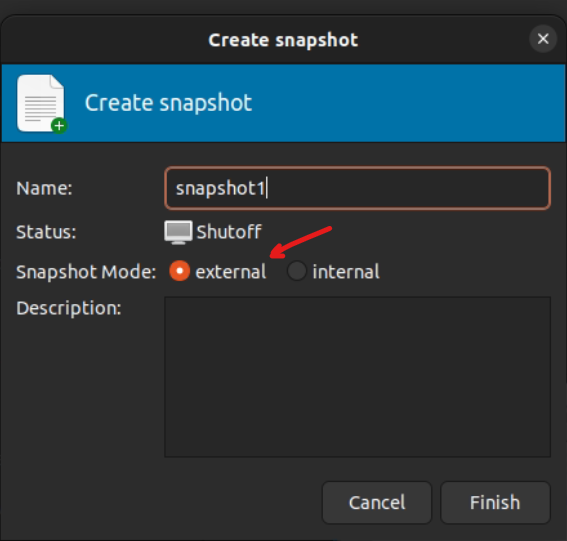
When any given snapshot is external, it’s label will be suffixed with “(External)”.
VirtualBox
If you are going for VirtualBox you can take the snapshot from the graphical user interface or the command line:
$ VBoxManage snapshot "<Name of VM>" take "<Name of snapshot>" --pause
After the snapshot creation is completed, you can power off the machine and restore it:
$ VBoxManage controlvm "<Name of VM>" poweroff
$ VBoxManage snapshot "<Name of VM>" restorecurrent
VMware Workstation
If you decided to adopt VMware Workstation, you can take the snapshot from the graphical user interface or the command line:
$ vmrun snapshot "/your/disk/image/path/wmware_image_name.vmx" your_snapshot_name
Where your_snapshot_name is the name you choose for the snapshot. After that power off the machine from the GUI or the command line:
$ vmrun stop "/your/disk/image/path/wmware_image_name.vmx" hard
XenServer
If you decided to adopt XenServer, the XenServer machinery supports starting virtual machines from either disk or a memory snapshot. Creating and reverting memory snapshots require that the Xen guest tools be installed in the virtual machine. The recommended method of booting XenServer virtual machines is through memory snapshots because they can greatly reduce the boot time of virtual machines during analysis. If, however, the option of installing the guest tools is not available, the virtual machine can be configured to have its disks reset on boot. Resetting the disk ensures that malware samples cannot permanently modify the virtual machine.
Memory Snapshots
The Xen guest tools can be installed from the XenCenter application that ships with XenServer. Once installed, restart the virtual machine and ensure that the CAPE agent is running.
Snapshots can be taken through the XenCenter application and the command line interface on the control domain (Dom0). When creating the snapshot from XenCenter, ensure that the “Snapshot disk and memory” is checked. Once created, right-click on the snapshot and note the snapshot UUID.
To snapshot from the command line interface, run the following command:
$ xe vm-checkpoint vm="vm_uuid_or_name" new-name-label="Snapshot Name/Description"
The snapshot UUID is printed to the screen once the command completes.
Regardless of how the snapshot was created, save the UUID in the virtual machine’s configuration section. Once the snapshot has been created, you can shut down the virtual machine.
Booting from Disk
If you can’t install the Xen guest tools or if you don’t need to use memory snapshots, you will need to ensure that the virtual machine’s disks are reset on boot and that the CAPE agent is set to run at boot time.
Running the agent at boot time can be configured in Windows by adding a startup item for the agent.
The following commands must be run while the virtual machine is powered off.
To set the virtual machine’s disks to reset on boot, you’ll first need to list all the attached disks for the virtual machine. To list all attached disks, run the following command:
$ xe vm-disk-list vm="vm_name_or_uuid"
Ignoring all CD-ROM and read-only disks, run the following command for each remaining disk to change its behavior to reset on boot:
$ xe vdi-param-set uuid="vdi_uuid" on-boot=reset
After the disk is set to reset on boot, no permanent changes can be made to the virtual machine’s disk. Modifications that occur while a virtual machine is running will not persist past shutdown.
Azure
Once you have a virtual machine that is ready to be your golden image for a virtual machine scale set, take a snapshot of the virtual machine’s disk.
Official documentation on how to do this: Create a snapshot of a virtual hard disk
We are now going to turn this snapshot into an “image”, which is the terminology Azure uses as the base for all virtual machines in a scale set.
- Create a Compute Gallery resource.
- Create an Image Definition in this Compute Gallery.
Operating System state must be SPECIALIZED
Create an Image Version, and select “Disks and/or snapshots” as the Source.
Select the snapshot of the golden image.
The creation of an image from a snapshot takes a while, so be patient.
In the az.conf file, you will need to specify the Compute Gallery Name as well as
the Image Definition Name.